Showing posts sorted by date for query tutorial. Sort by relevance Show all posts

Monday, September 30, 2013

TIAS DAY FOUR

Tomorrow I am going on "vacation" to visit my husband whom I have not seen for three months (due to military service). You will still get your TIAS bits but I may not be as readily available to answer questions and emails. So please bare with me.
DAY FOUR


I'll repeat here something I posted on the community blog last night concerning days 1-3, "Should your motif be cupped or flat? The answer is flat. There are two reasons your motif would cup, one is that the picots are not the correct length (they should measure 1/4"), if the picots are too long you will get a 3D effect, the other reason is tension is too tight on the outer chains."

I understand that we all tat differently and that tatting a TIAS presents it's own challenges because we are constantly taking breaks and coming back to our tatted piece. The diagrams are there to keep you on track and help you orient your piece in the right direction, this means that depending on how you tat, parts of the written directions may not always apply to you, for example TW's and RW's (tutorial included in the pattern)so try not to get hung up. That is why we do both written directions and diagrams.

Keep up the good work, I enjoy all you tatters so much!

Sunday, April 1, 2012

Happy International TATTING Day!! "Branching Encapsulation" is officially released!!!


Those of you who pre-ordered will be happy to know that your books are already on their way to you! They were all shipped this past Friday.
My hubby is so glad this project is now behind me. It has been all consuming. But all the hard work has been worth it, this is a product that I am very proud of. It has literally been years in the making. I just know you will all enjoy it!
For those who are going to Shuttlebirds and have requested a copy I will be bringing yours in just a few short weeks!

A special thank you to all my test tatters! You know who you are and you can finally reveal yourself if you so choose!

Purchase Here

Learn a new tatting technique and expand your skills. This book walks you through a new tatting technique called "Branching Encapsulation". It is a technique that is built upon and goes beyond traditional encapsulation. Not only is this an instructional book that takes you step by step through the technique, it also includes several gorgeous patterns.
Recommended for intermediate to advanced tatters.


About this publication:
This is a high quality publication.
It is full letter size
Has well over 100 color photographs and diagrams
Is laser printed on calendar paper
Has comb binding so it lays nice and flat.
20 pages of full instructions on how to do the "Branching Encapsulation" Technique
6 versatile and original patterns are included as well as a bonus tutorial on cabone rings.

First Edition 2012
Pence Publishing
Boise Idaho

Friday, December 2, 2011

My Memories Suite V3 coupon code STMMMS91823 Save $20


I made the above using this software program. I love Chai tea...epecially the authentic thick and milky version. So I am sharing this recipe as a gift to you.
Click on photo to enlarge it and then you can save it. Enjoy!

MyMemories Suite Version 3 (BRAND NEW release November 2011)


The newest version of this fantastic software has just been released. Please use this coupon code for a discount of $10 off the software and another $10 coupon for their store! STMMMS91823
Just type or copy and paste the code into the PROMO CODE BOX upon check out.

You can try it before you buy it! CLICK HERE for Trial Version.

Don't forget to use THIS code STMMMS91823

For those who already own the software here is a nifty cardmaking tutorial.


I am currently tatting (((YAAAAAAYYY!!)))...sorry for the shouting but I am excited to be actually tatting again. I will be sharing soon!

Thursday, July 2, 2009

TUTORIAL: WORKING thread VS. CORE thread with beads

A few posts back I was playing around with beads and I said I would share what I was doing. If you are a follower of my blog you know my life has been super crazy. But I always keep my promises...even if it takes seemingly forever. So here we go:
This is the first part...(double rows of beads tutorial to come at a later date).


Working Thread VS. Core Thread using beads:


Load up your shuttle with your beads.

In this tutorial all rings are 2double stitches each separated by 7 beads total.

In case you didn't know..(and I didn't know this for a long time) the thread in the ring is called your working thread because it will make up the double stitches. The thread coming from the shuttle is called your core thread because it is the thread that runs through the core of your stitches.

This example shows how beads are added to a ring the "normal" way. It's the way most of us tatters add beads. These beads are brought into the circle of Working thread that makes up the ring.

And this is what a ring looks like when we add beads on the Working thread.

Another way to do it, (and for a completely different look) you can add the beads from the core thread which is coming off of your tatting shuttle. See how the beads being added in this picture are not contained in the circle?

Here is what the rings look like side by side. The ring on the left was tatted with beads from the working thread and the ring on the right was tatted with beads on the core thread.

So of course, the next thing to do would be to mix it up and bring in beads from BOTH the working and the core threads as you can see in this photo.

Although I haven't done it in this example, if you wanted you can even get trickier by having the working thread beads a different color than the core thread beads. Cool eh?

Here are all three rings together.

...and I kept on going with some zany combos until I ran out of beads....if this doesn't give you some new ideas I don't know what will....LOL!


I hope you enjoyed this tutorial. Now you can jazz up your tatting in a new way.

Of course I always love and invite comments, so please don't be shy and just say "hi".

Saturday, January 24, 2009

2 Shuttle Tatting Tutorial: Floating Rings

This is #3 for the 25 motif challenge.
Tatted in size 20 Apricot Mousse hand dyed silk tatting thread.


You can take a pattern that is normally a shuttle and ball thread pattern and turn it into a two shuttle pattern (in lieu of ball thread you use another shuttle).
Why would you want to do this?
Well it opens up some options like "floating" rings.

Take the above motif for example: Half of the motif is tatted in the regular way (shuttle = rings, ball thread = chains, tat a chain, do NOT reverse work, tat a ring, do NOT reverse work, tat another chain and you get a nice pointy effect).

The other half is tatted by the "thown off" or "floated" ring method.

This concept is easier to demonstrate by using two different color threads.


Shuttle #1 = Yellow thread (Ring)
Shuttle #2= Red thread (Chain)

To "throw off" or "float" a ring you simply use your chain shuttle (#2 in this case) to make your ring instead of using your ring shuttle (#1).

Once you understand and utilize this 2 shuttle tatting method you can "tweak" patterns to suit your personal taste. Pointy verses Round, also if you tat with two different colors you can have control over the placement of your color in pattern.

Another thing to think about is which direction the top your chains are facing. This does make a difference in the shape of your end product. How do you do this? Please visit my Turn Work VS. Reverse Work tutorial.


For future reference all my tutorials can be located in my side bar to the right.

Happy tatting!

Wednesday, December 17, 2008

Creating your own blog and adding links....

Well,
I've gotten many emails since yesterday and many of you are seeking help with adding links to your blog. My computer has been down all day and this is the first chance I've had to respond.
So here goes:

Maybe you love to read tatting blogs but don't have a blog of your own because computers seem intimidating...well it's easy and here is a video tutorial on how to start your own blog if you want:
http://kr.youtube.com/watch?v=BnploFsS_tY

For those who have just started a blog and are still learning the ins and outs... here is a video tutorial on how to add links to your blog....like I have in my sidebar.
http://kr.youtube.com/watch?v=-OVRlXn9mAs&feature=channel_page

Remember, in order to be in the FREE shuttle drawing you just have to have a link from your blog to mine AND leave a comment on that blog post. That's it! The contest is open until Jan 15 2009.

Thank you to all who have inquired about my finger. Well, I don't want to gross anyone out...but the nail is separating today and it SMARTS! But...it seems to be growing out fast so I don't think it will be painful much longer.

Thursday, October 16, 2008

Predict the future / Save your thread: Thread Tutorial

Do you hate not having enough thread on your shuttles when you start a project or having too much thread left over on your shuttle after you complete your project?
I might be able to help you.
I have discovered a way to predict how much thread you will use in a project before you even begin to wind your shuttles. You can do this for any size thread. I've been using this method for awhile and it really works well. This method is especially handy when you want to spare as much of that precious HDT "Hand dyed thread" as possible. You can predict how much HDT (or any thread) you will need to use in project before starting. This is ever so helpful for determining projects, especially those big ones. Also, this method is individualized to your style of tatting whether your tension is tight or loose, you can determine how much thread YOU will use.

Now I would like to share this tip with you!

Please do not get scared away by the math. It really is pretty simple.

Take your ball thread and measure a 12" length of thread. Do not cut.
Mark the thread at the beginning.
Tat 10 double stitches. (See the mark on the thread?)
After tatting 10ds, measure how much thread is left and subtract from 12". In my case it takes 4" of size 20 thread to make 10 stitches. So now I know that for every 10 ds in a pattern I will need 4" of thread.

Let's take this pattern and predict how much size 20 thread we will need to use.
One inner pink ring is 12 ds, so let's multiply 12ds X 6 rings = 72ds
Since 10ds = 4" of thread you can divide 72/10 = 7.2 and multiply that by 4" = 28.8 inches. You'll want to include room for picots, core thread and tails so I would round this up to 1 yard (or 36 inches). So I would wind my shuttle with one yard of pink thread for the inner rings.


Break it down, now let's do the brown thread:

One chain = 16ds, multiply that by 6 chains = 96ds

One ring = 14x6 =84ds

96+84=180ds

180/10=18

18x4=72 inches

72 inches divided by 1 yard (36 inches) = 2 yards

Add a little room (maybe 1 foot) for core thread, picots and tails.

So you'll wind your second shuttle with 2 yards and 1 foot of thread.

Whaddya think? Bloody Brilliant...that's what!

No more wasting thread!

Friday, June 27, 2008

"Reverse Work" vs. "Turn Work" TATTING tutorial

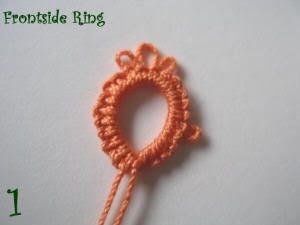
I think this can be a confusing concept for beginner tatters. So I tried to simplify the concepts for you visually.
This example is tatted in the traditional way.

Photobucket
Photobucket
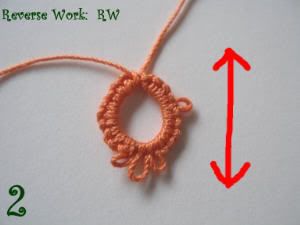
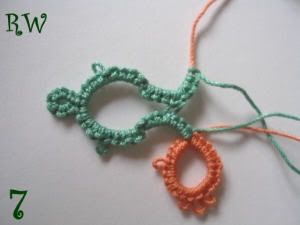
Reverse Work "RW" means to flip from top to bottom.

Photobucket

Photobucket
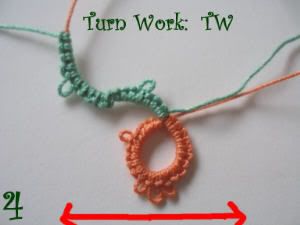
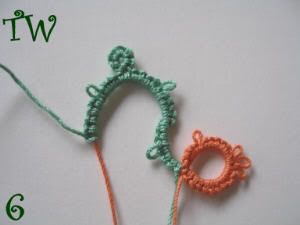
Turn Work "TW" means to turn like a page in a book...from right to left.

Notice how the chain turned directions. I use a lot of TW's in my patterns.

Photobucket
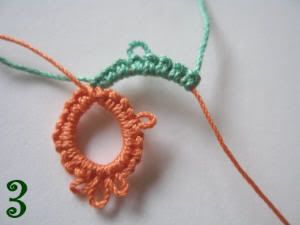
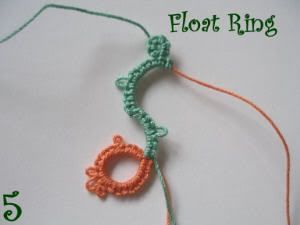
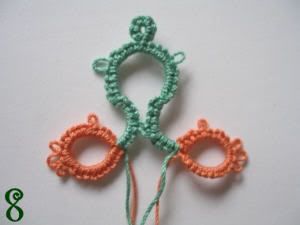
Here's a bonus picture showing a "floating ring". If Orange is Shuttle #1 and green is shuttle #2 (in lieu of ball thread), you can use shuttle #2 to throw off rings.

Photobucket
Photobucket
Photobucket

Tuesday, March 18, 2008

Unwinding Hand Dyed Tatting Thread: Tutorial

I asked Clyde to post his HDT unwinding method and he graciously did. Thank you Clyde!
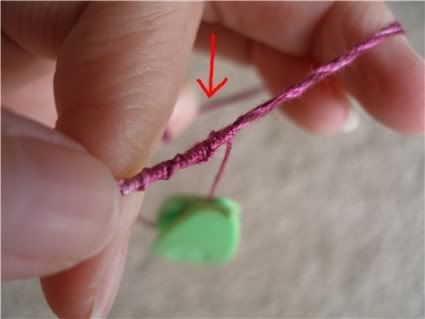
I had planned to post this for awhile but you know how life gets in the way. Suzanne really prompted me to finally share this, so here it is.

This is the way I unwind skeins of hand dyed thread.


Photobucket
I start with a pillow that will comfortably sit in my lap. The more texture the pillow has the better to hold the thread.
Photobucket
I then undo the skein until it looks like this.
Photobucket
There will be two ends that have thread ties holding the skeins together. You can go ahead and cut these or untie them. On my skeins one of these thread ties will always be close to the start/end thread.
Photobucket
Untie the start/end thread and wind onto your choice of spool. I use these floss winder cards. These cards work well, and it is an easy way to keep all my personal HDT on a ring for future use.
Photobucket
Finally, I take one of the ends, (The closest one to the top of the pile of threads) and I unwind by hand all the thread onto the card holder. This method keeps everyting tidy and tangle free. If you have a different method I would love to hear it. It's facinating to see how people approach things differently.
Photobucket
This is what a 50 yrd skein of size 20 HDT looks like on a card holder. I do the same thing with other sizes of tatting thread.

Tuesday, November 27, 2007

Josephine "Spiral" Chain Tutorial

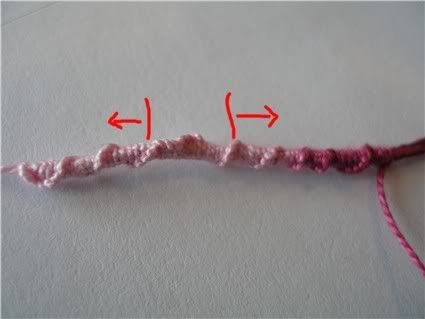
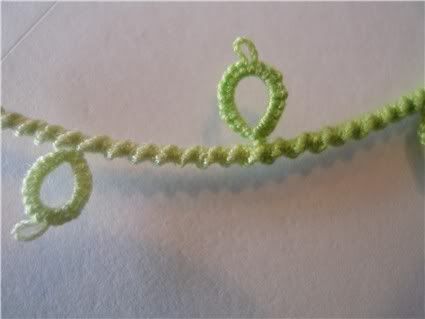
This is the way I do Josephine or "Spiral" chains and I thought I would share it. It is very simple and the results are very nice. The books I have read state that you should use the first half of the double stitch over and over to create the chain. I prefer to use the second half of the double stitch and I drop the shuttle every 5 stitches to make a nice uniform twist.
Photo Sharing and Video Hosting at Photobucket
As you can see in this first photo. I used my method for the first 15 stitches or so then I did the middle section of 20 stitches where I did NOT drop the shuttle. As you can see, the stitches are all bunched up and are not very attractive. I then resumed using my tatting method.
Photo Sharing and Video Hosting at Photobucket
This photo shows the location where I drop the shuttle every five stitches. I then pick up the shuttle and resume the process.
Photo Sharing and Video Hosting at Photobucket
Finally, this photo is an example of what I would consider to be a good Josephine treatment.

I think a lot of people shy away from using this simple stitch because if done improperly it doesn't look very attractive. But now you know a simple little trick to make it look really nice.

Side note: Josephine chains are done by (encapsulation, reverse tatting, unflipped stitch). These are some of the different names used for the same method.